Apple Mac Startup Options

Startup shortcuts

Use these key combinations to change how your computer starts up. Press and hold the key or combination of keys immediately after starting your Mac until the expected function occurs or appears. For example, press and hold the Option key during startup until the Startup Manager appears.

Key or key combination What it does
Option or Alt Display all startup volumes (Startup Manager)
Shift Start up in Safe Mode
C Start from bootable media (DVD, CD, USB thumb drive)
T Start up in Target disk mode
N Start from a NetBoot server
X Force OS X startup (when non-OS X startup volumes are available)
D Use Apple Hardware Test
Command-R Use OS X Recovery (OS X Lion or later)
Command-Option-R Use Internet Recovery on supported computers
Command-V Start up in Verbose Mode
Command-S Start up in Single User Mode
Command-Option-P-R Reset NVRAM
Hold down the Media Eject (?) key, F12 key, or mouse or trackpad button Eject removable discs

Sleep, shut down, and log out shortcuts

Use these key combinations after your Mac has started up to sleep, shut down, log out of, or restart your computer.

Key or key combination What it does
Power button Tap to power on. Once powered on, tap the power button to wake or sleep your Mac.
Hold down the power button for 1.5 seconds Show the restart / sleep / shut down dialog
Hold down the power button for 5 seconds Force the Mac to power off
Control-Power button Show the restart / sleep / shut down dialog
Command-Control-power button Force the Mac to restart
Command-Option-Power button Put the computer to sleep
Command-Control-Power button Quit all apps (after giving you a chance to save changes to open documents), then restart the computer
Command-Option-Control-Power button Quit all apps (after giving you a chance to save changes to open documents), then shut down the computer
Shift-Control-Power button Put all displays to sleep
Command-Shift-Q Log Out
Command-Shift-Option-Q Log Out immediately

Automatically chop up audio and save as mp3 – Adobe Audition

Do you have a long mp3  file (or any other audio format) that you’d like to chop up into smaller pieces and save as individual files? I did and found the following article on how to do this in Adobe Audition which has the ability to batch export marker ranges as individual files.

This feature is most useful for splitting a long recording into several individual assets, but it can also be used to create unique copies of the sections of audio that are most important within any open audio file. Here’s an example of how this works.

  1. Open an audio file into the Edit view of Audition.
  2. Go to Window > Marker List to open the Markers Panel.
  3. Select a section of audio that you would like to export as its own file.
  4. Click the F8 key on your keyboard or click the “Add Marker” button in the Markers Panel.
  5. Repeat steps 3 and 4 for each section of audio you wish to export as a new file.
  6. When you are done marking each section, go to the Markers Panel and give each marker its own name (Label) or leave them with the default generic marker labels.
  7. Select the marker ranges you wish to export (CTRL or SHIFT + click each marker).
  8. Click the “Batch Export Marker Regions” button which is at the bottom of the Markers Panel with a floppy disk icon. If this button is disabled it means you either do not have any markers selected or you have individual point markers chosen and not ranges (range markers will always have a begin and end time).
  9. When the Batch Process Marker Ranges dialog appears you can choose to either “Save to files”, or add a certain amount of silence to the start and end of each marker. For the purpose of this walk-through, choose “Save to files”.
  10. Next, you can choose if you want to use the Marker label as the filename, or set your own Prefix and Sequence Start number for all exported files.
  11. Once you have the naming convention chosen, choose the destination of where the individual files will be saved and set your export format and options.
  12. Click OK to export your new audio files.
  13. Browse to the folder you exported your new files to and take the next steps to burn them to CD, email them to clients, archive them for later or continue editing each asset in Audition.

Source: http://blogs.adobe.com/audition/2010/06/using_audition_to_save_section.html

Outlook 2010 signature button not working (64-bit)

I recently removed Office 2010 (32-bit) and installed the 64-bit version. This introduced the problem where my signatures in Outlook were no longer being added to emails.

I fully understand the process of creating signatures, how they work, where they are saved etc so off I went to File > Options > Mail > Signatures

My issue was that the “signature” button, when pressed, wouldn’t open the window with all the options for creating and editing signatures. Clicking it just did nothing!

After a bit of searching I found the following solution…

Use “regedit” to change the “(Default)” and “LocalServer32” values in each of the keys below to C:\Program Files\Microsoft Office\Office14\Outlook.exe

HKEY_LOCAL_MACHINE\SOFTWARE\Classes\Wow6432Node\CLSID\{0006F03A-0000-0000-C000-000000000046}\LocalServer32

-and-

HKEY_LOCAL_MACHINE\SOFTWARE\Classes\CLSID\{0006F03A-0000-0000-C000-000000000046}\LocalServer32

Once the keys have been changed, launch outlook and the signature button will work again allowing you to change your signature preferences.

Note: The above fix will also work for the 32-bit version of Outlook, just change the C:\Program Files\Microsoft Office\Office14\Outlook.exe to C:\Program Files (x86)\Microsoft Office\Office14\Outlook.exe

outlook-regedit

Bitlocker “Preparing Automatic Repair” at Startup Windows 8.1

We recently bought an Asus S400C notebook for a client that needed to be configured with Windows 8.1 and secured with Bitlocker. After upgrading from Windows 8 to 8.1 we ran in to the following problem…

PROBLEM: After enabling Bitlocker and booting with the encryption key on a USB key we can’t get into windows. It sticks at the boot screen saying “Preparing Automatic Repair”. If you remove the USB stick it goes straight to the bitlocker screen giving you the option to enter the recovery code or reboot.

SOLUTION: Go into the BIOS and disable the “FAST BOOT” option.


Create bootable USB drives from ISO’s

Create bootable USB drives
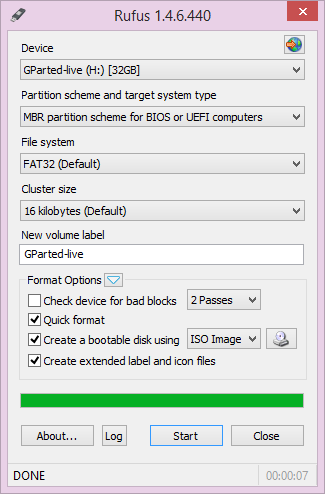
A while back I was looking for an easy way to create a bootable USB stick version of a Windows 7 disc that I had to install on a number of workstations that didn’t have CD-ROM drives. I found the following utility that can create USB installation media from bootable ISO’s.

RUFUS  http://rufus.akeo.ie

“Rufus is an utility that helps format and create bootable USB flash drives, such as USB keys/pendrives, memory sticks, etc. It can be especially useful for cases where:

  • you need to create USB installation media from bootable ISOs (Windows, Linux, UEFI, etc.)
  • you need to work on a system that doesn’t have an OS installed
  • you need to flash a BIOS or other firmware from DOS
  • you want to run a low-level utility

Despite its small size, Rufus provides everything you need!”

Google redirects to a fake flash player update on both pc and mobile.

Trying to get on google but keep getting a page saying flash needs updating which in turn tries to get you to download a virus / malware? Do you have a TP-Link modem / router? Chances are your router has been hacked!

A customer of ours had this problem the other day, tried to get to google and kept getting this message in the browser to update flash pro. They  ignored the antivirus software’s warning and went ahead and downloaded the so called update. PC now infected! Many hours later after a clean install (just to make sure) we gave the customer their PC back.

When they returned home, plugged in, turned on, same message again when trying google! Didn’t matter which browser they used, always the same. All other sites worked fine apart from google. I got them to try on their other pc and smartphone, same thing. So this made me think it must be some kind of routing issue with the router. Turns out that their TP-Link router is pretty easy to hack and had been.

Here’s a link to a video on how to hack the router in question http://www.youtube.com/watch?v=wy4n8a3dy0Q

In short their routers DNS was changed from  8.8.8.8 to 50.63.128.135 This meant that when they try to get google the request was going to a dodgy server dishing out this fake flash player.

As yet I don’t think there is a firmware fix for this and a number of TP-Link routers may be affected. However you can protect yourself by blocking any external access to the router by enabling SPI which can be found under the Advanced Setup > Firewall section.

After more digging I found a few more people who have had this issue… http://www.bleepingcomputer.com/forums/t/526812/help-google-redirects-to-a-fake-flash-player-update-on-both-pc-and-mobile/page-3

Malicious DNS

The Malicious DNS

Enable SPI to secure

Enable SPI to secure

MSSQL Maintenance cleanup task does not delete older files

If you are running Microsoft SQL Server 2008 R2 and find that your maintenance cleanup task is not deleting old files then it’s likely to be one of the following…

  1. Make sure you have the correct path specified and that it does not have a “\” on the end
  2. Make sure the file extension does not have a dot before it e.g.  “.bak” It should just read “bak”. You could also try *.* that would delete all files regardless of their file extension.

sqltask


iPhone 5 and MTP USB device failed to install Windows 7

Had problems the other day installing a new iPhone 5 for a customer on a Toshiba Satellite Pro running Windows 7 64bit.  The phone worked fine in iTunes but it could not been seen as a removable drive under “Computer”.

Did all the usual stuff like unplugging all other devices, reboots, uninstall in device manger etc. Nothing worked then I came accross the following article that worked!

  1. Run the registry editor (type in “regedit” in the command-line”)
  2. Backup your current registry (File > Export)
  3. Navigate the following path: HKEY_LOCAL_MACHINE / SYSTEM / CurrentControlSet / Control / Class
  4. On the left side, search for the entry {EEC5AD98-8080-425F-922A-DABF3DE3F69A} and click on it
  5. On the right side, you will find a key which begins with “Upper…” – delete it!
  6. Now unplug your iPhone
  7. Restart your computer
  8. Plug in your iPhone and hopefully find it mounted as a drive again!

BOOM!!

Strength In Numbers Leeds Premiere

It’s finally here! Well at least on the big screen! Been waiting for months for this to be released and our regular group of mountain biking buddies are showing our support by going to see the Leeds premiere over at Hyde Park Picture House tonight.

SYNOPSIS:-

“Viewed at a distance, the world of mountain biking is a disjointed network of seemingly similar but disconnected communities. Freeride. Downhill. Big Mountain. All Mountain. Dirt Jump. Slopestyle. A sport of individuals, equally defined by their many differences, as the common threads that bind. And while our story doesn’t follow a straight line, we all end up in the same place. Tire to ground, foot to pedal, hand to bar – communities drawn together by trails of dirt.

A new action sport documentary, Strength in Numbers is a rally call to connect all mountain bikers, regardless of location or language or discipline. The film captures a true way of life, from the world’s best pros to those who are just learning to love the sport. Shot over two years in some of mountain biking’s most iconic locations, Anthill’s signature style combines compelling stories with core action to create a shared experience that unites all riders. Come join us!”

http://www.anthillfilms.com/strengthinnumbers/

Order your Collectors’ Edition 3-in-1 with 1 hour of exclusive extra features.

Download from iTunes stores worldwide.

http://www.hydeparkpicturehouse.co.uk/index.php?showing=3936#now-showing

Target IE versions with CSS “Hacks”

Found an article today that I found useful while trying to sort a little issue I had with the lack of CSS3 support in older versions of Internet Explorer.

Target IE versions with CSS “Hacks”

Here are the hacks that let you target specific IE versions.

Use “\9” to target IE8 and below.
Use “*” to target IE7 and below.
Use “_” to target IE6.

Example:

body {
border:1px solid red; /* standard */
border:1px solid blue\9; /* IE8 and below */
*border:1px solid orange; /* IE7 and below */
_border:1px solid blue; /* IE6 */
}

If you don’t like using “Hacks” then you can explicitly target IE versions without hacks using HTML and CSS

Use this approach if you don’t want hacks in your CSS. Add a browser-unique class to the <html>element so you can select based on browser later.

Example

<!doctype html>
<!–[if IE]><![endif]–>
<!–[if lt IE 7 ]> <html lang=”en” class=”no-js ie6″> <![endif]–>
<!–[if IE 8 ]> <html lang=”en” class=”no-js ie8″> <![endif]–>
<!–[if IE 9 ]> <html lang=”en” class=”no-js ie9″> <![endif]–>
<!–[if (gt IE 9)|!(IE)]><!–><html lang=”en” class=”no-js”><!–<![endif]–>
<head></head>
<body></body>
</html>
Then in your CSS you can very strictly access your target browser.

Example

.ie6 body {
border:1px solid red;
}
.ie7 body {
border:1px solid blue;
}

Original article here… http://stackoverflow.com/questions/814219/how-to-target-ie7-ie8-with-css-valid-code